Visits: 0
In my former post, i showed you How To Create A Blog With Blogger.Com. Herein, I will show you as simple as possible how to set up your created blog.
begin by getting a view of what your newly created blog looks like. From your blogger dashboard, bottom-left click on the link to “View Blog.”
To get back to your blog so as to edit it to have a better view, click on the little orange “B” next to the search field at the top left of your browser window. If you are already logged in, this will take you to your blog Dashboard. If you aren’t logged in, then you will first need to log in (using the Gmail user name and password that you set up when you created your blog. If you forget the blogger Gmail login user name and password, you will not be able to log into your blog. So, write somewhere safe and hidden these blog login details.
Because we want to customize or set our blog look to our taste, we need to create some posts so as to help give us a view of how our published pots will look like.
So, we are going to create our first post.
We will do from the dashboard in the following steps:
Step 1 – Click on the “NEW POST” button found on the top left corner under your blog name.
In the blog post, You may be wondering about the following questions
Q1 – What is a blog post?
Q2 – What will make a great blog post?
Q3 – How to write a good blog post?
I will come to that in another post in future. For now, we need simple posts to help configure and set up our blog.
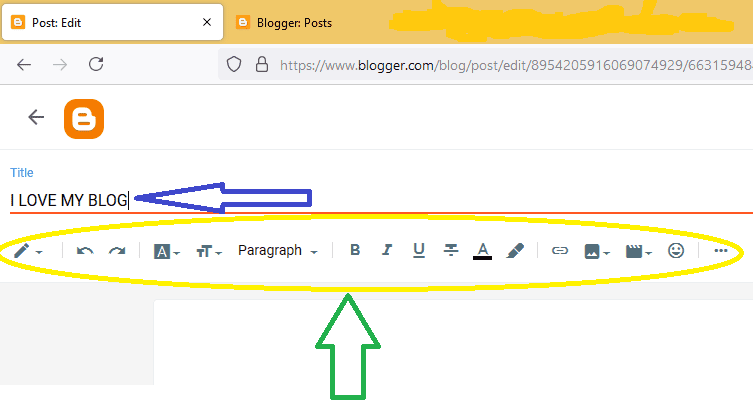
Step 2 – Go to the Title window on top and insert the title of the post you wish to write. Say for example i write the title, I LOVE MY BLOG. It will look like this in the figure below.
Step 3 – We move next by writing all I want to communicate to my audience about my post. This post content must follow Google guidelines of a minimum of 400 words per post. Here we are illustrative and we are going to write as post content, the following.
- I love my blog and i am doing all to make it a success. I have promised myself to do all it will take to feed it and ensure that it grows. What my joy will be when my blog will rise and be named among the best. For sure, my blog will provide me with money. Ha Ha Ha, My Blog, i love my blog.
Step 4 – When you finish typing in your post content, arrange it. Bold titles, paragraph group of words, number items and underline where necessary.
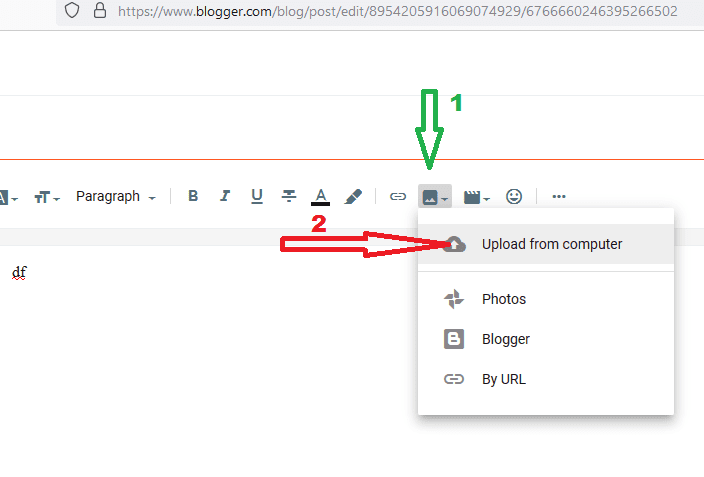
Step 5 – Fit in your post image. This is an original photo illustrative of what your post content is all about. Get the photo downloaded to your computer. Then head to the specific area of your post content where you will want your photo to appear. Click there so the mouse pointer will be there. Now, head to the insert image icon on the right side of the text writing aides. Immediately the mouse pointer comes on it, you will see it show the insert image. You click on it as you will be taken to your PC picture bank, choose the downloads and type the name of the image which will come up. Simple click and click again on upload from the computer as seen here below:
The add images window appears after loading, click on choose files to upload.
Another window opens with images. You will have to search for the particular image you plan to use, select it, then click on the image, its file name will appear in the file name window. There is an Open button that is highlighted, click on it to upload the image to your content post.
For illustration purposes, we will use B orange icon image for bloggers.
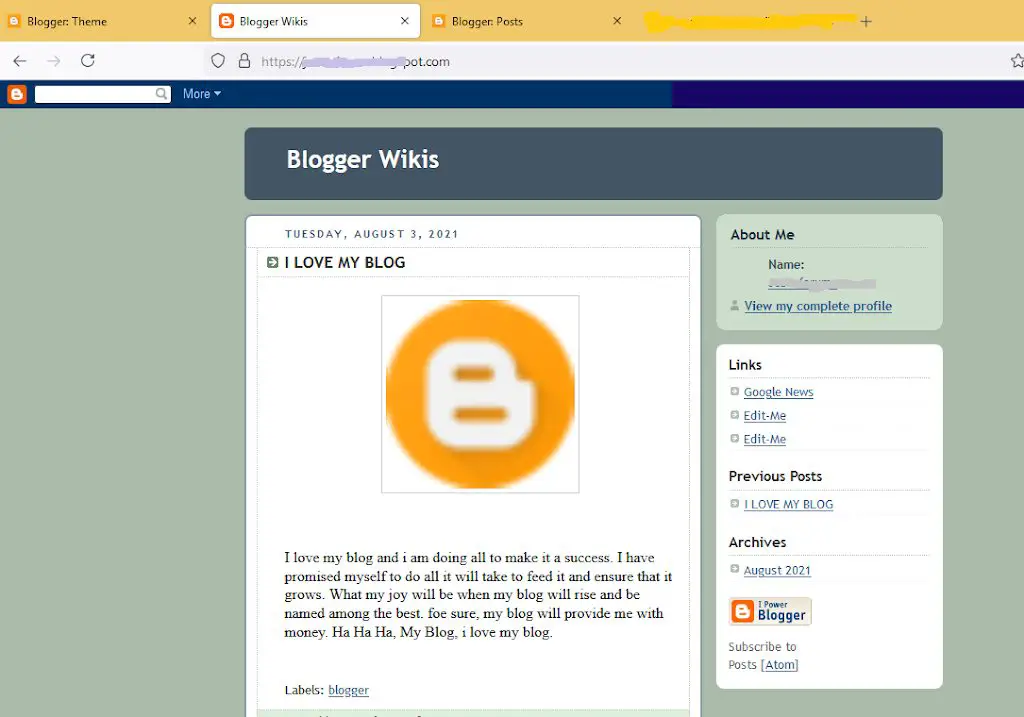
Step 6 – Ensure that every part of your post is well presented as you will want it. Include a label for your post. If all is well, click on the orange “publish” on the right top of your blogger dashboard. A smaller window opens with a publishing confirm request. You just confirm it and your post will be published. Our published post should look like this.
Step 7 – Changing Theme, Customize template, Edit HTML of your template and the like are before you as soon as you click on Theme on your blogger dashboard. I will warn you to ensure that you backup your template before any restore so that you can at any time revert to the former view if in case the new one is not good for you. Be very careful when working on your HTML board because any errors could lead to your blog going off from search engines. Contact me if in case you are faced with any challenges in any part of this post.


%20(1).png)

