

Visits: 1
The Windows 10 Media Creation Tool is a highly important tool for people who want to update or reinstall Windows 10. In this article, I’ll teach you how to use the Windows 10 Media Creation Tool to create Windows installation media or to download an ISO file, complete with thorough instructions and screenshots.
When installing or upgrading Windows 10, you’ll need installation media, such as a bootable USB drive or CD/DVD disc. Furthermore, the Windows 10 Media Creation Tool allows you to generate an installation USB drive or download its ISO file, which you can then burn to a DVD to install the operating system on another computer.
It sounds that using Media Creation Tool to upgrade or install windows 10 is very convenient. However, some users don’t know what it is and how to make use of this utility.
What Is Windows 10 Media Creation Tool
The free Windows 10 Media Creation Tool is a very popular utility developed by Microsoft. With this marvelous Windows 10 creation tool, you can upgrade Windows 10 to its latest version without a hassle and create a Windows 10 installation USB drive/DVD disc to perform a clean install or to repair a problematic PC.
Use Windows Media Creation Tool to Upgrade Your PC
Windows Media Creation Tool is also a Windows upgrading tool, since it may upgrade your PC to the most recent version of Windows 10. Many Windows 10 customers report that using Windows Update to upgrade Windows 10 may result in issues such as the common Windows 10 update error 0x8007007e, resulting in upgrade failure.
It is strongly advised in this instance to use the Windows 10 Media Creation Tool to upgrade Windows 10. You may rapidly upgrade your machine to the latest version of Windows 10 with this Windows upgrading program. Here are full instructions with screenshots.
Note: If you intend to upgrade your current computer to Windows 10, make sure it meets the Windows 10 system requirements.
Step 1. Download Windows 10 Media Creation Tool from Microsoft’s official website.
Step 2. Run the Media Creation Tool. To run this tool, you need to be an administrator.
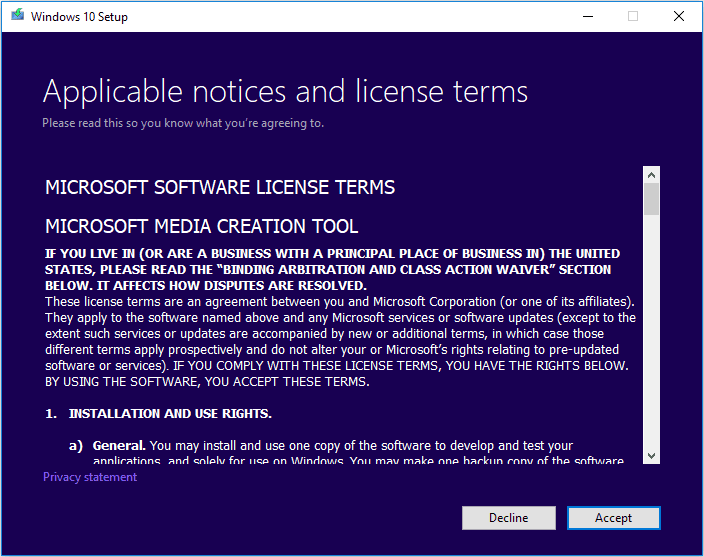
Step 3. On this page, select Accept.
Step 4. Wait patiently for Media Creation Tool to get a few things ready. When it’s done, you can continue.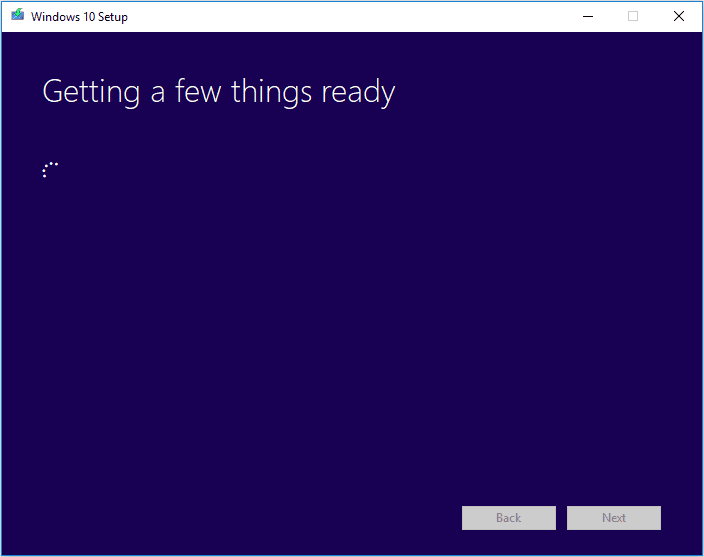
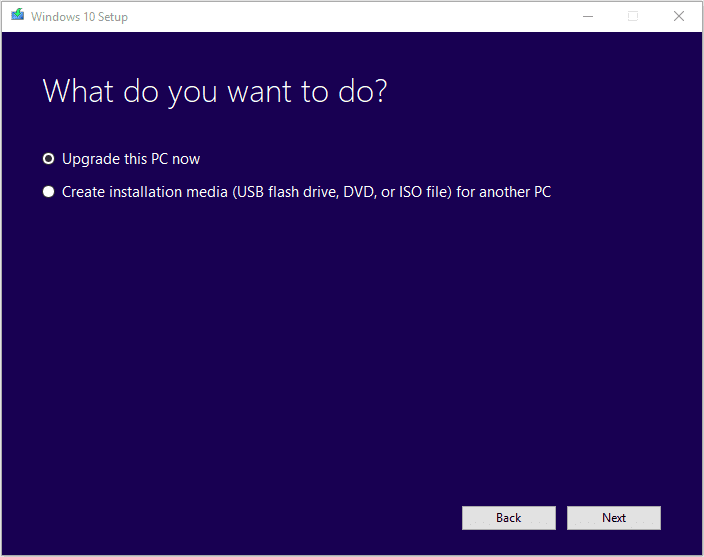
Step 5. On the What do you want to do page, select Upgrade this PC now, and then click Next.
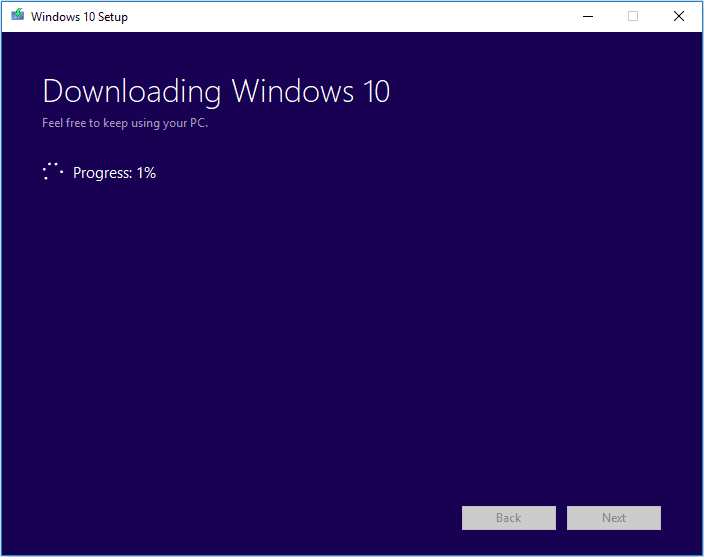
Step 6. At this time, Media Creation Tool will download some files for updates and then check your PC. This process may take some time. Just wait patiently and it won’t be too long.
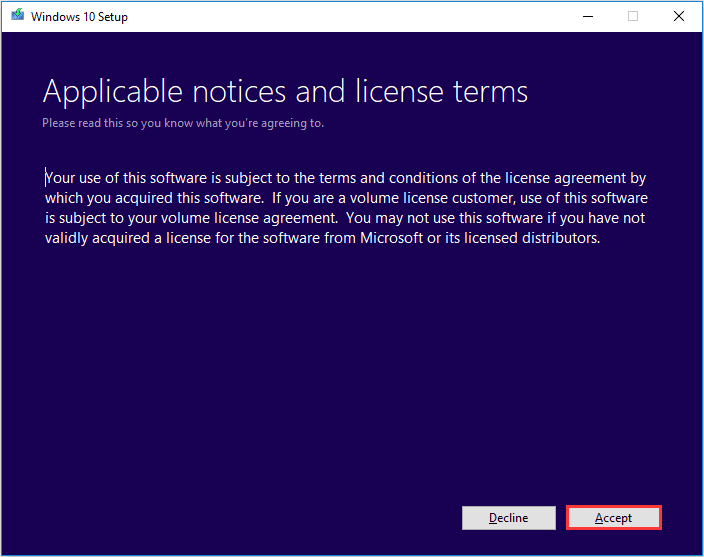
Step 7. Read the license terms and click Accept.
Step 8. Wait for Media Creation Tool to check for updates.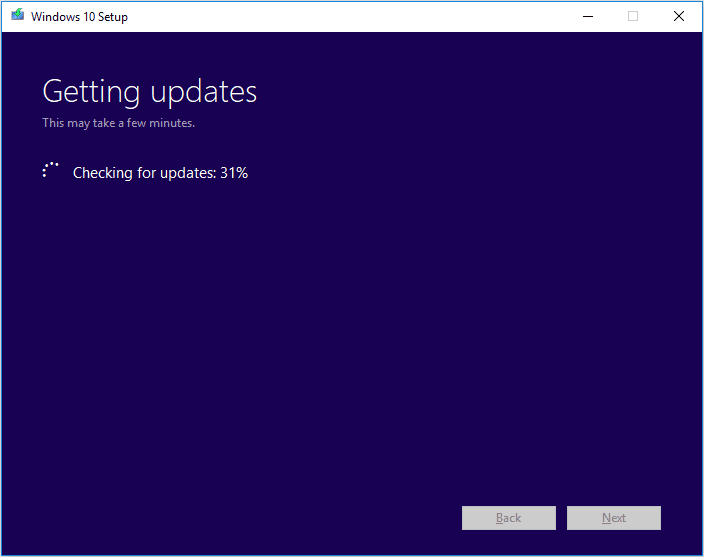
Step 9. Windows 10 Media Creation Tool will check for your PC again and make sure you are ready to install.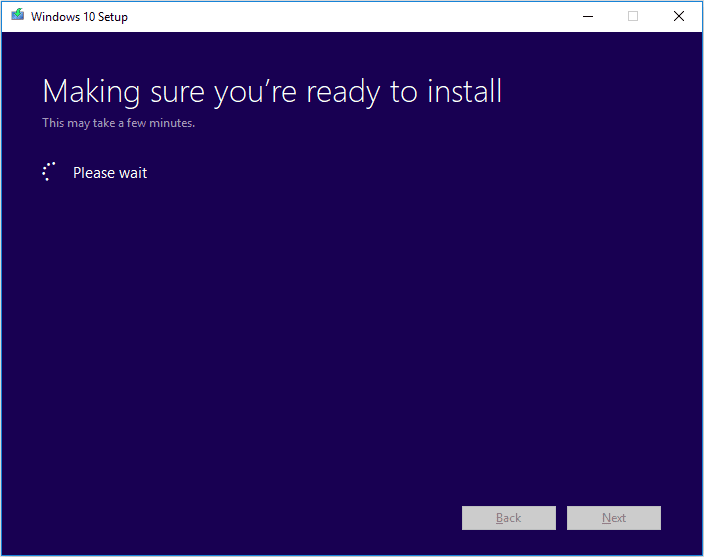
Step 10. When you get this page, you’ll see a recap of what you’ve chosen, and what will be kept through the upgrade. Choose Change what to keep, you can select what to keep by yourself.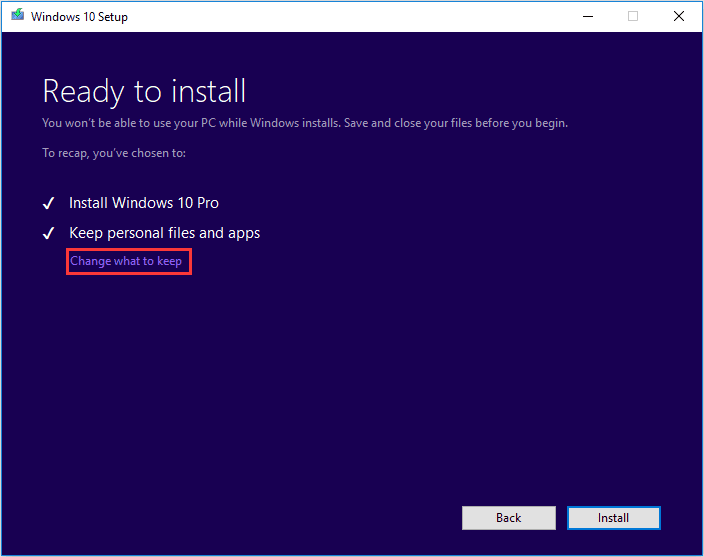
Step 11. Choose whether you would like to Keep personal files and apps, Keep personal files only, or keep Nothing during the upgrade. After selection, then click Next to continue.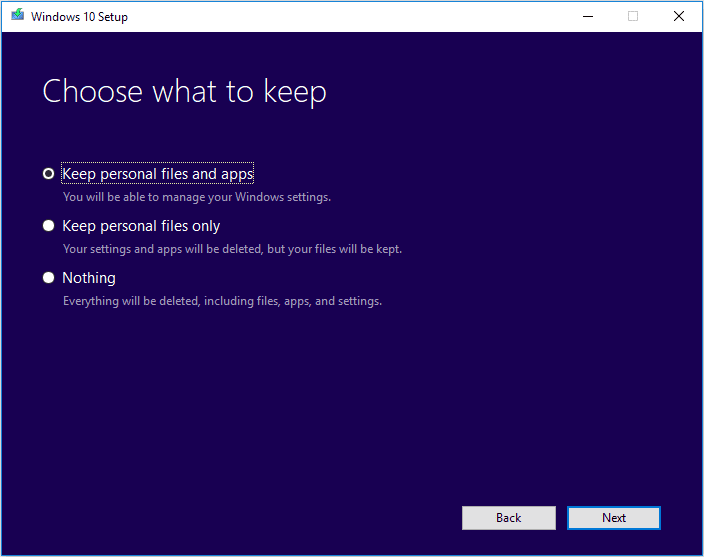
Step 12. Close any running applications and when you’re ready, select Install. During the installation, your PC will restart for a few times. Please don’t turn off your PC.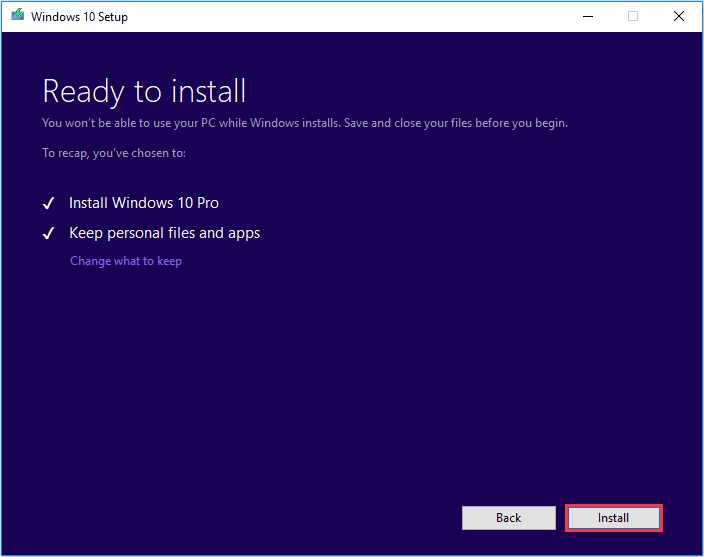
Create an Installation Media or Download ISO file
Another function of Window 10 Media Creation Tool is that it can help you create an installation media for another PC or download ISO file. And all Windows 10 editions are available when you select Windows 10, except for Enterprise edition. When finished, you can use the bootable USB drive or DVD disc to install Windows 10.
Note: Before you install or reinstall Windows on your PC, remember to back up important files on your system disk.
Before you download Windows 10 Media Creation tool, make sure you have:
- A PC with a working Internet connection
- A blank USB flash drive or DVD with at least 8 GB of available storage space
- A product key if you’ve not installed Windows 10 before or if you want to perform a clean install
Now you can follow the steps as below to create Windows 10 installation media (USB flash drive or DVD) and use it to install a new copy of Windows 10, perform a clean installation, or reinstall Windows 10.
Step 1. Download Windows 10 Media Creation Tool and follow the instruction to get the following page. Then, check the second option Create installation media (USB flash drive, DVD, or ISO file) for another PC and click Next.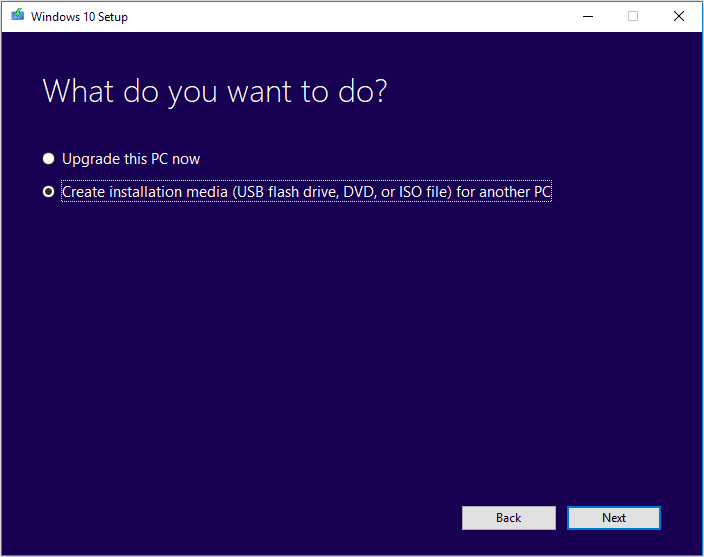
Step 2. Choose the Language, Windows Edition, and Architecture that you want to use for creating the installation media. After selection, then click Next to continue.
You can also choose to Use the recommended options for this PC, which automatically selects the language, edition, and architecture that match the PC that you are using right now.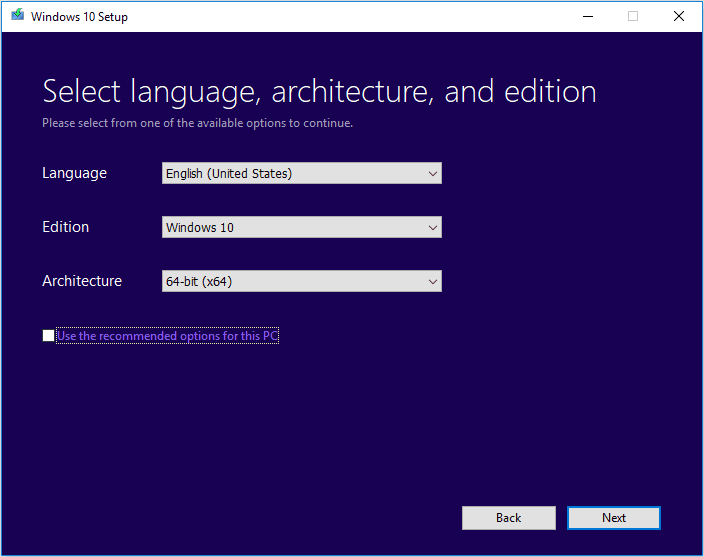
Step 3. Choose what kind of media storage device you want to use. Here I take USB flash drive as an example. Choose USB flash drive and press Next.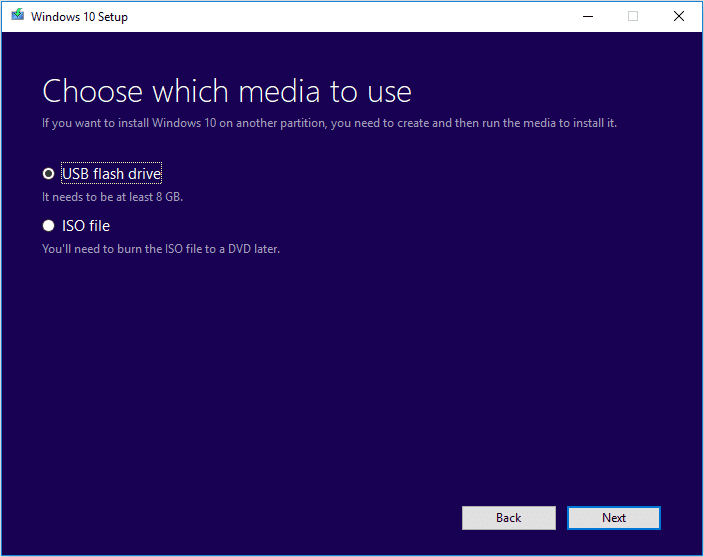
Step 4. Select the USB drive you want to use for creating Windows 10 installation media and click Next.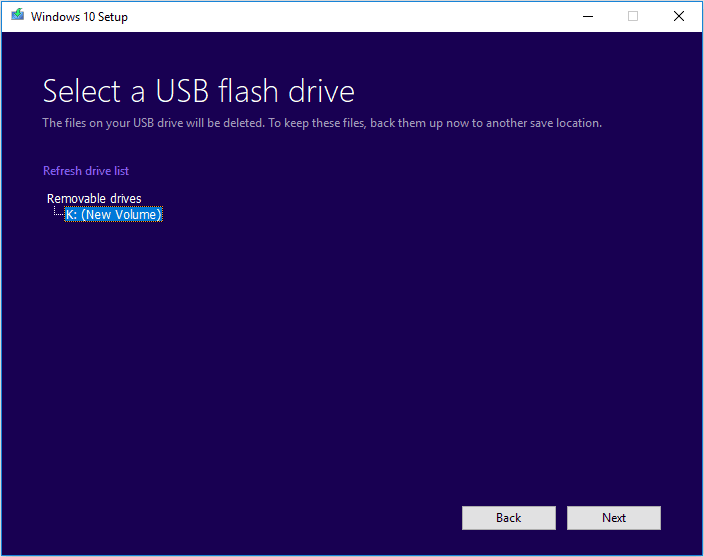
Step 5. Then Microsoft Media Creation Tool starts to download the latest Windows 10 installation files on your computer or device.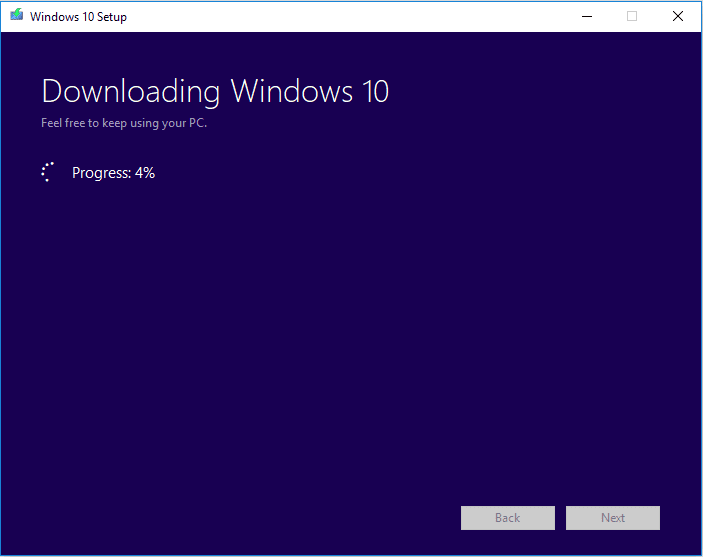
Step 6. When the download is completed, it will start to create Windows 10 media.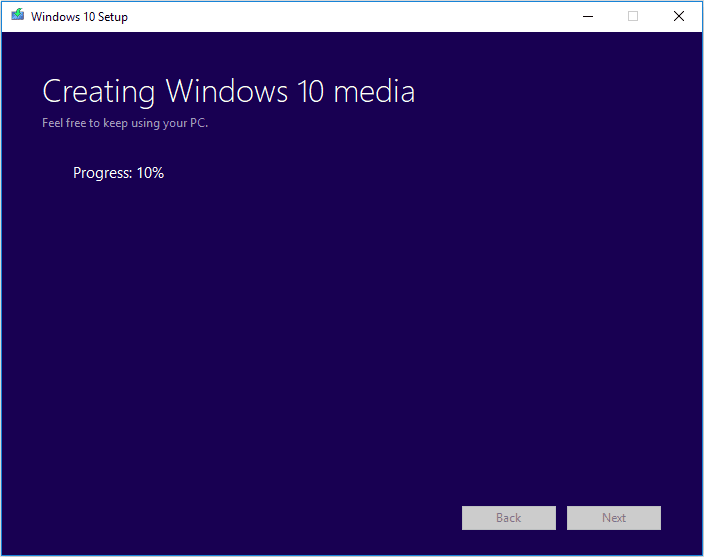
Step 7. When it is done, click Finish and then you can use that drive to boot up your computer and install Windows 10.
If the computer that you want to install Windows 10 has a DVD player, you can also select ISO file to burn the ISO file to a DVD later.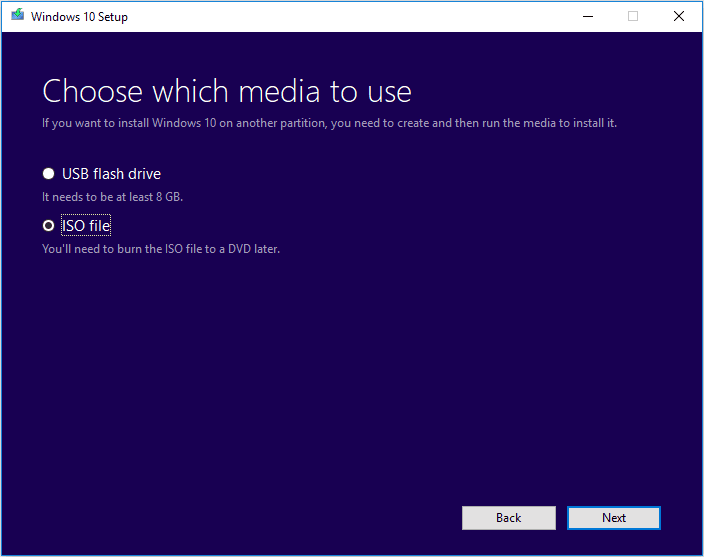
Just follow the step-by-step prompts on the Media Creation Tool to download Windows 10 installation files and save the ISO file to a specific location. When it is finished, you can burn the ISO file to a DVD.
How to Upgrade or Get Windows 10 without Installation
After reading the above, some users may find, even Windows Media Creation Tool is easy to use, it will still take you much time to upgrade or install Windows 10. Is there any much simpler way on Windows installation?
Actually, there is a method that can make Windows 10 installation as a breeze – migrate Windows 10 from another healthy PC to your PC with a Windows migration tool. If your friends or family are using the latest Windows 10, you can just use the Windows migration tool to migrate their Windows OS to your PC without reinstallation.
In this way, you do not need to create an installation media with Windows 10 Media Creation Tool and then use it to install Windows 10 as the whole process is time-consuming.
Well then, how to migrate Windows 10 with a reliable Windows migration tool? Here it is recommended to use MiniTool Partition Wizard Pro Ultimate Edition to migrate Windows 10, which can migrate OS to various types of SSD/HDD, including NVMe M.2, PCI4 4.0 SSD, and more.
MiniTool Partition Wizard is a reliable Windows migration tool as well as a professional partition manager trusted by tens of millions of people. It helps users to repartition hard drive, extend partition, convert FAT to NTFS, check files system, convert MBR to GPT without data loss, wipe disk, copy partition and migrate OS to SSD/HD, etc.
With MiniTool Partition Wizard, you can use Windows 10 operating system without installation.
Step 1. Shut down your computer and take out your system disk. Connect the HDD/SSD to another PC of your family or friends who are using the latest Windows 10 via a SATA-to-USB cable.
Note: If there are important files and data on your system disk, please make a backup as the process will delete all the files on your disk. If it is a brand new disk, then you can go ahead directly.
Step 2. Get the system cloning software to computer by clicking the following button. And run it to get the main interface.
Step 3. Select the function Migrate OS to SSD/HD Wizard on the top toolbar.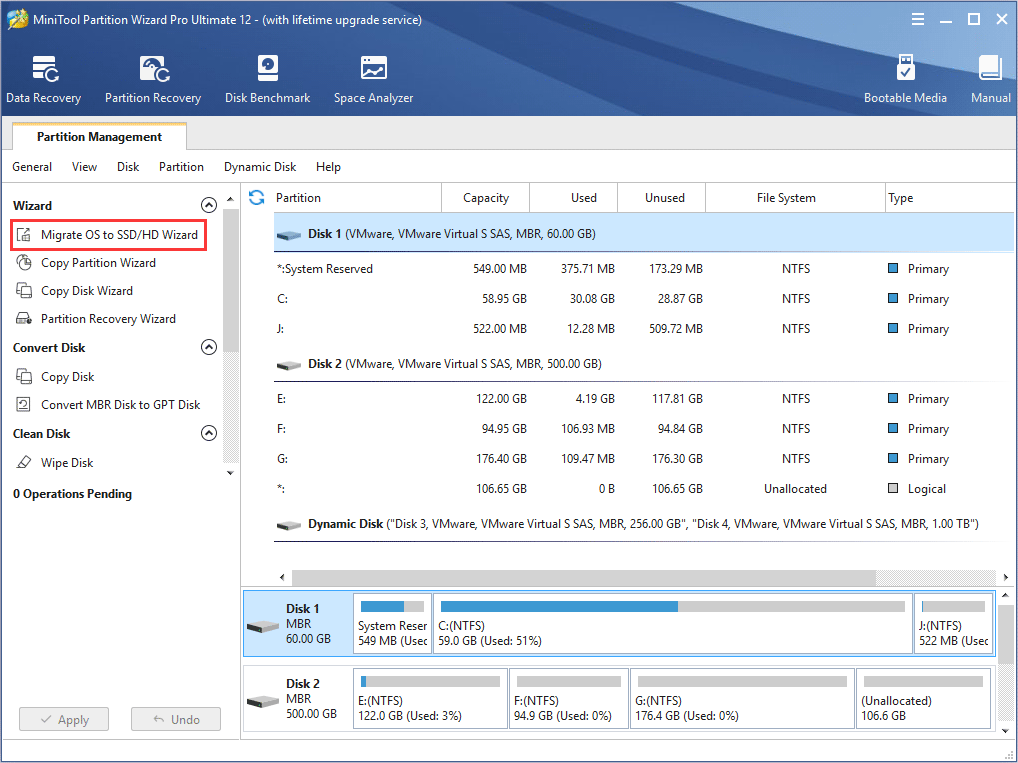
Step 4. Choose option B to move operating system to another hard disk, as the following picture shows.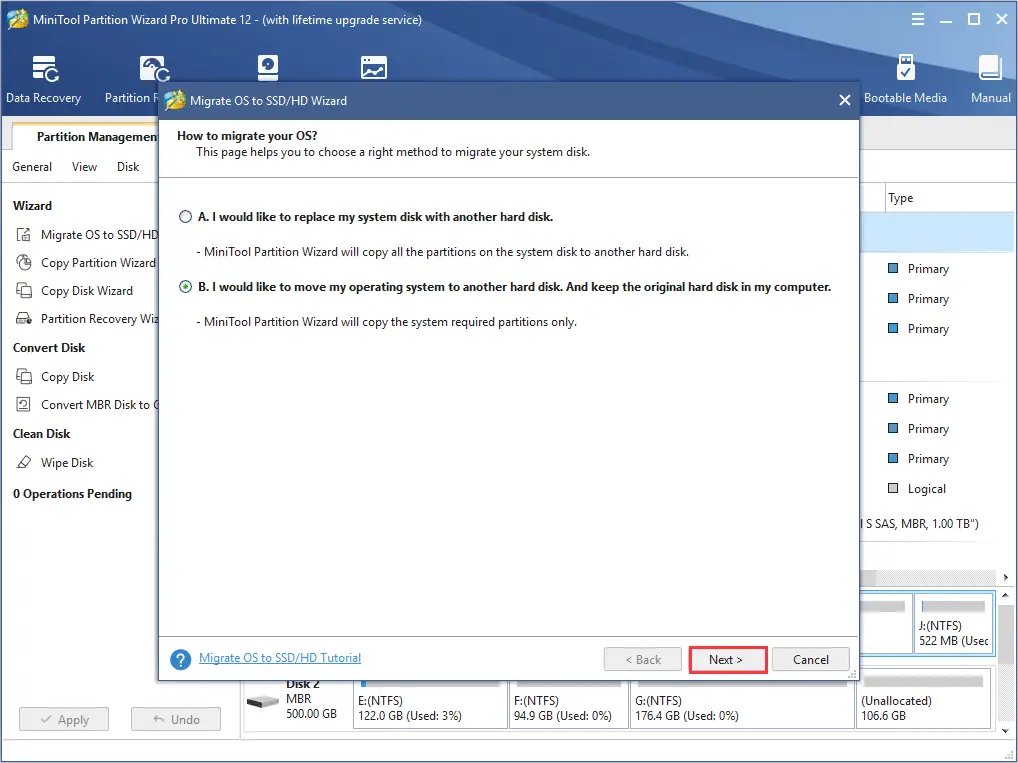
Step 5. Then, choose your HDD/SSD to migrate OS to and click Next.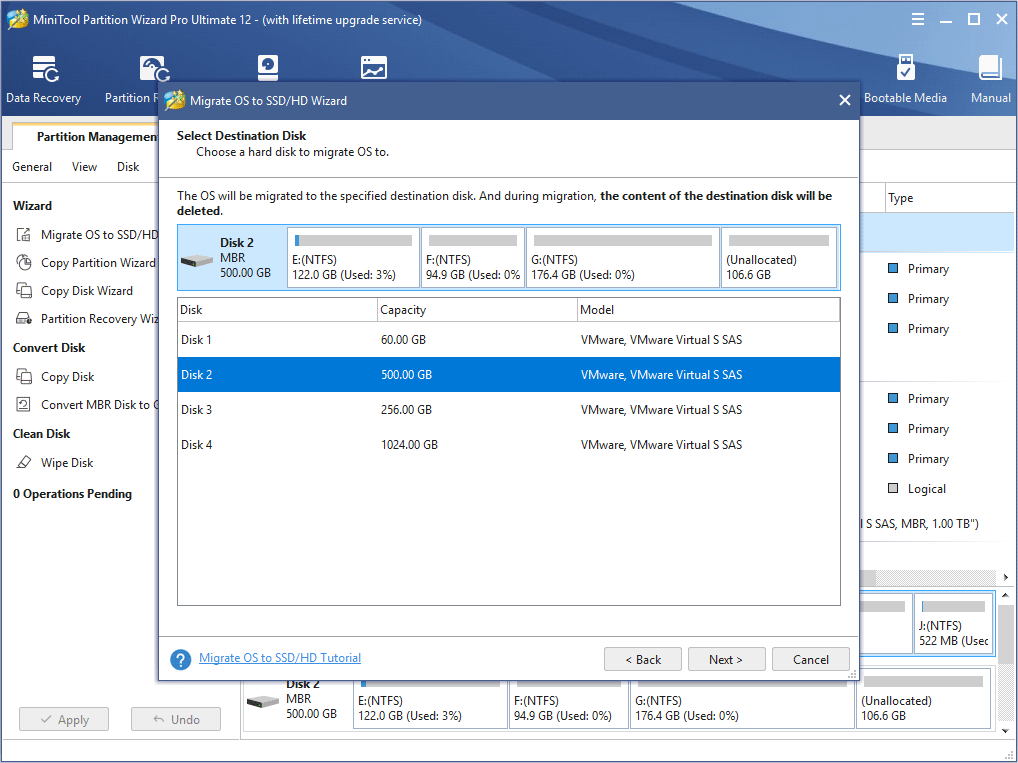
Step 6. All data saved on your HDD/SSD will be destroyed, so please make sure there is no important file and data on the SSD or backup significant ones in advance. Then click Yes on the pop-up Window.
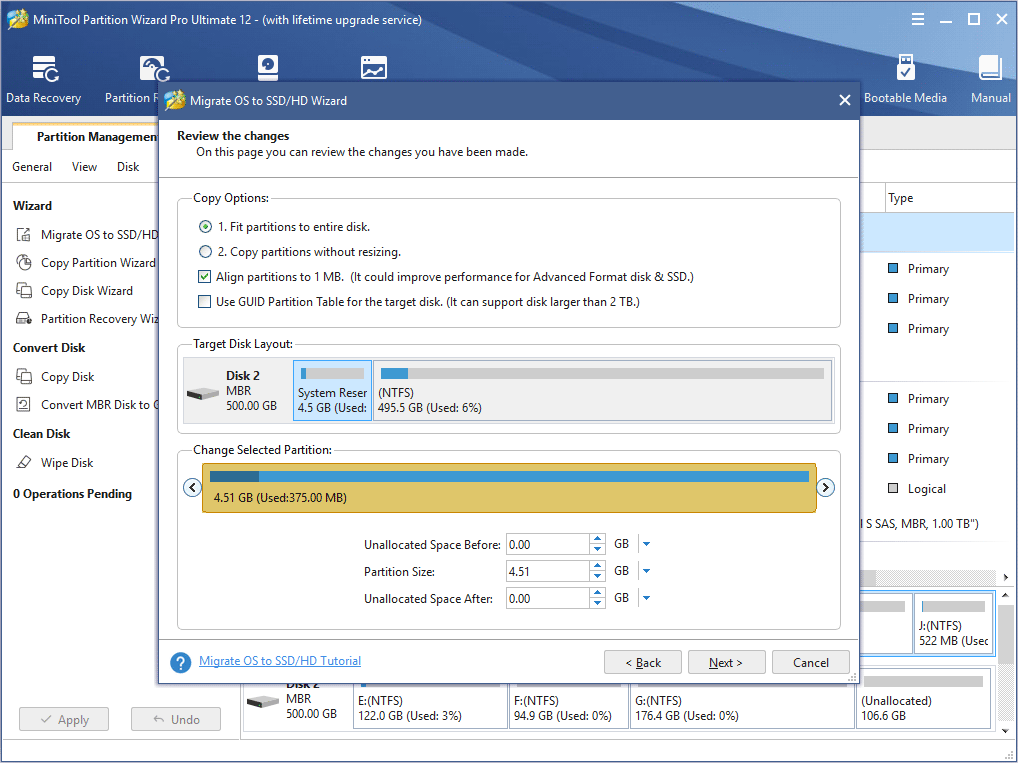
Step 7. Choose a copy method and click Next. If you choose the first one, system partition and boot partition will be enlarged to take up all space of the SSD. If you choose the second one, partitions will be cloned with the same partition size, but you can adjust partition size and location according to actual demands by dragging the handle.
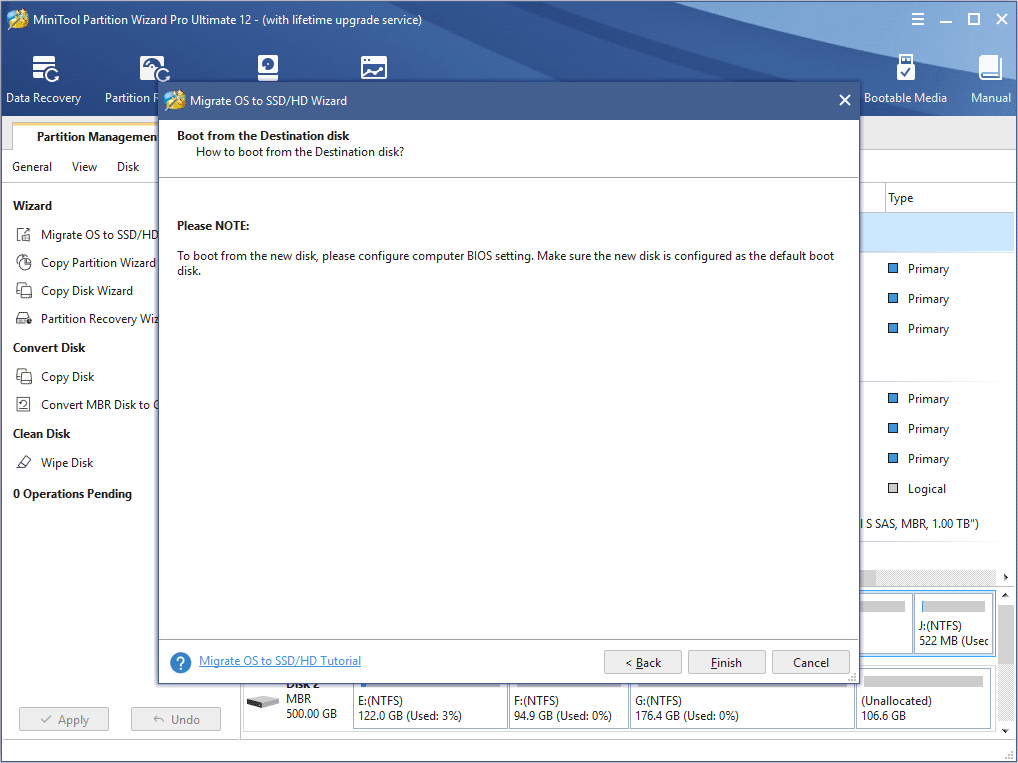
Step 8. This page will remind you to reset BIOS order, giving the new SSD boot priority, so your computer can boot from the new system disk successfully. Then click Finish.
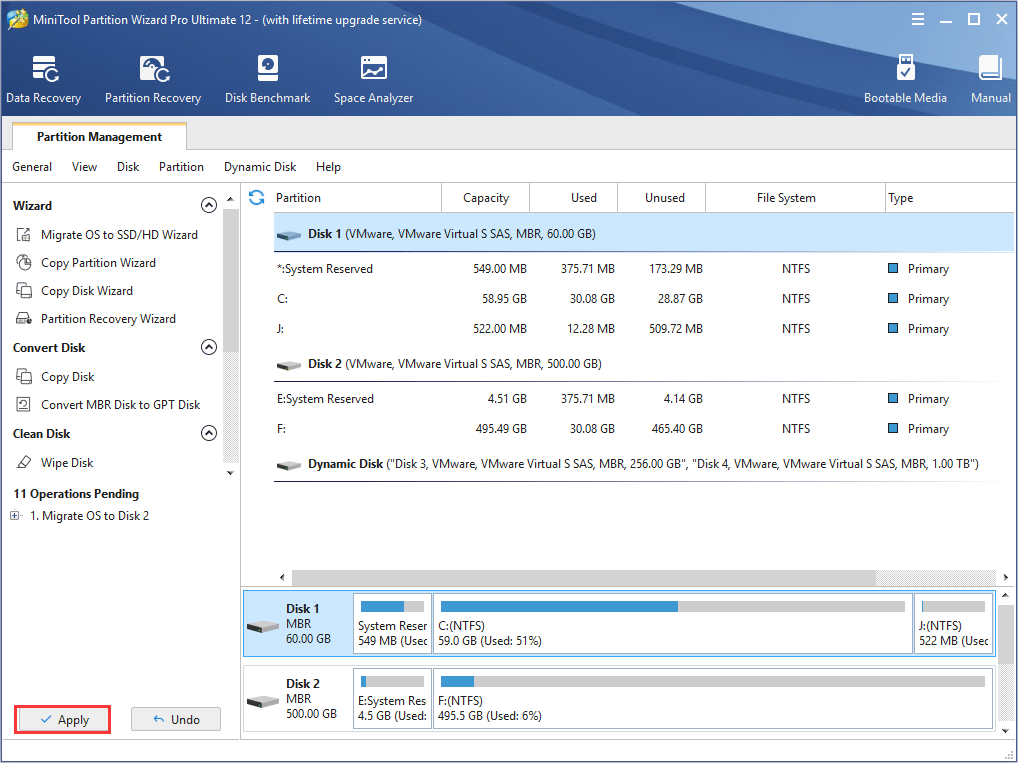
Step 9. At last, please click Apply button on the top to apply all these pending operations. Since the Windows OS is still running, MiniTool Partition Wizard will ask you to restart the computer for data protection.
step 10. you can enter BIOS and then set the newly installed SSD/HDD as the default boot disk. If you don’t know how to boot from the NVMe M.2 SSD, you can refer to this post.
You see, it is very convenient to migrate OS to another disk with this Windows migration tool. If you find Windows reinstallation is troublesome and time-consuming, you can try using MiniTool Partition Wizard, which can be a big help.
Bottom Line
After reading this post, have you learned how to use Windows 10 creation tool or how to migrate Windows 10 with MiniTool Partition Wizard Edition? If you do, now try these methods to get the latest Windows 10 now!
If you have any question about how to clone Windows 10 to SSD/HD with MiniTool Partition Wizard, you can leave a message in the following comment zone and we will reply as soon as possible
Windows 10 Media Creation Tool FAQ
How do I get Windows 10 media creation tool?
You can get Windows 10 media creation tool by visiting the Microsoft Media Creation Tool website. Then click the Download tool now button from the webpage. Then install and run the application on your PC. After that, you can choose to create installation media for another PC or upgrade Windows 10 with Windows 10 media creation tool.
How do I upgrade to Windows 10 using media creation tool?
First, visit the Microsoft support website. Click the Download tool now button on the page. Run the Media Creation Tool and click the Accept button to agree to the terms. On What do you want to do page, select Upgrade this PC now and click Next. Then follow the prompt to complete upgrade to Windows 10.
How do I create a bootable USB using Windows 10 media creation tool?
Prepare a blank USB flash drive with at least 8 GB and connect it to your PC. Download the free Windows 10 media creation tool from the Microsoft’s official website and run the tool. On the What do you want to do page, select Create installation media for another PC. Then select language, Windows Edition, and Architecture for the installation media. On Choose which media to use page, select USB flash drive and follow the prompts to create the bootable USB drive.
What is Windows 10 media creation tool?
Windows 10 Media Creation Tool is a free utility developed by Microsoft, which lets you create a Windows 10 installation USB drive or download its .ISO file that you can burn on to a DVD to install the operating system on a different computer. With Windows 10 creation tool, you can upgrade Windows to its latest version or create a Windows 10 installation USB drive/DVD disc to install Windows 10 or repair a Windows PC.
%20(1).png)


