

Visits: 0
Setting Up DNS Records for Your Domain in Cloudflare: A Step-by-Step Guide
As a website owner, you understand the significance of a fast and secure online presence. Cloudflare, a leading content delivery network (CDN) and security provider, can help you achieve both. One crucial aspect of configuring your website on Cloudflare is setting up DNS records correctly. In this comprehensive guide, we will walk you through the process step by step. Setting Up DNS Records for Your Domain in Cloudflare: A Step-by-Step Guide
Why DNS Records Matter
DNS (Domain Name System) records are essential components that link your domain name to the corresponding IP address of your web server. They play a vital role in directing traffic to the right destination. Cloudflare provides an extra layer of security and performance to this process. Here’s how you can set up DNS records for your domain:
1. Log into Your Cloudflare Account
If you don’t have a Cloudflare account yet, create one. Once logged in, select your domain to manage it.
2. Choose the DNS Tab
Navigate to the “DNS” tab in your Cloudflare dashboard. This is where you’ll manage all your DNS settings.

3. View Existing DNS Records
Before making any changes, take note of your existing DNS records. This is essential to ensure you don’t disrupt your website’s functionality.

4. Add a DNS Record
To add a new DNS record, click the “Add Record” button.
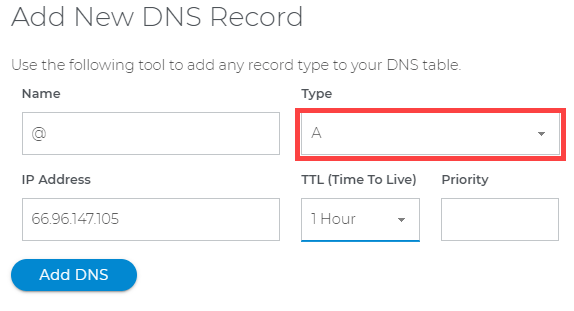
5. Select the Type of DNS Record
Choose the appropriate DNS record type based on your needs. The most common types include:
- A Record: Used to point your domain to an IPv4 address.
- CNAME Record: Useful for creating aliases or subdomains.
- MX Record: Used for email servers.
- TXT Record: Typically for domain verification or authentication.
6. Configure the DNS Record
Now, you’ll need to enter the details for your DNS record:
- Name: This is the hostname or subdomain (e.g., “www” or “blog”).
- IPv4 Address: Enter the IPv4 address for the A record or the target domain for CNAME records.
- Priority: Only required for MX records to specify email server priority.
- TTL (Time to Live): This is the time the DNS record will be cached. A lower TTL means more frequent updates but may increase server load.
7. Save the Record
After configuring the DNS record, save your changes. The record will be updated in Cloudflare’s DNS system.
8. Wait for Propagation
It may take some time for the DNS changes to propagate across the internet. Typically, this process can take a few minutes to a few hours, but it’s crucial to note that changes won’t be instant.
9. Test Your DNS Configuration
Once the changes have propagated, it’s essential to test your DNS configuration to ensure it’s working as expected. You can use various online tools to verify your DNS records’ correctness.

10. Monitor and Maintain
Regularly review your DNS records to ensure they remain accurate and up to date. Cloudflare provides you with a robust platform to make any necessary adjustments as your website’s needs evolve.
In conclusion, setting up DNS records for your domain in your Cloudflare account is a fundamental step in optimizing your website’s performance and security. Following this step-by-step guide will help you configure your DNS records correctly, ensuring that your website operates seamlessly and efficiently. With Cloudflare’s powerful features and your DNS records in place, your website is poised for success.
%20(1).png)

